Hola everybody!
I knocked out another DIY project yesterday and I thought I would share with you guys, what I’m calling my Photoline!
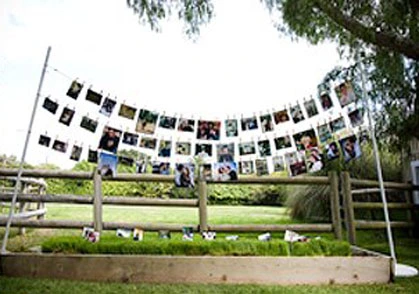
You may remember this picture from my inspiration board:

I wanted to see what I could do to create something like this that I could put inside, maybe by the guestbook instead of a bunch of picture frames, and then we’re also going to have a digital photo frame doing a slideshow of pictures of us through our lives/relationship.
This was kind of challenging to me because I had to come up with something that could hold the poles up and would be appropriate for being inside… how far apart to make them, if it would still look good if it was much smaller than the one in the inspiration pic, etc.
This is what I came up with:

Here are the supplies:

2 Flowerpots
Floral foam (enough to fill up your flowerpots)
*not pictured* something heavy, rocks(?) to go in the bottom of your flowerpot for stability
craft paint/acrylic paint/whatever you have around
foam brushes/paint brushes
glue gun / glue sticks
scissors
saw / knife (Must be strong enough to cut the wooden dowel)
1 wooden dowel cut/sawed into 2 pieces, mine was 48″ tall, so when cut in half, they are 2 ft tall each. The one I used had a 7/16″ diameter
sandpaper for sanding down rough edge that was cut on the dowel so that it will stand flat
moss
small silk flowers
2 wooden buttons (I used 1/2″ diameter ones)
twine
ribbon
***********************************
Instructions:
1. Plug in glue gun with a glue stick in it, and make sure you have a piece of paper or something under the tip so you don’t get glue on anything.
2. If not already done so, cut dowel into two 2 foot pieces (1 for each flower pot), and use your sandpaper to smooth the rough edge down from where it was cut so that it will stand up flat in the flower pot. If this is not done, your dowel could lean. Also, wrap the sandpaper around the dowel, and then grab the dowel where the sand paper is and run the sand paper up and down the dowel a couple times to smooth the dowel and ensure smooth painting.Rub off any wood dust created from this step.
3. Put rocks/other heavy substance in bottom third of flower pot. (Important, this will create stability!) Then put your foam on top of the rocks up to about a centimeter from the top of the pot. You may have to cut your foam for it to fit into the pots, a kitchen knife or the saw will work well for this. If there are any big gaps between the foam and the wall of the pot, you can fill them with pieces you trimmed off of the foam. The foam doesn’t have to be perfect since you’re putting moss on it later.
4. Put a dowel through the middle of the foam and push it to the bottom of your pot, making sure the dowel is as straight as possible, mine wasn’t 100% straight at first, and I used foam shavings to compensate for the angle it was leaning at and that fixed it perfectly. Use your glue gun and put glue around the perimiter of the foam to keep it from slipping out of the pot, put glue at the base of the dowel as well.

5. Glue a wood button to the top of the dowel, push it down to make it sit as flat as possible. Paint your pot and dowel with one coat of paint, making sure to get the inside rim of the pot as well. You don’t have to paint the bottom of the pot if you don’t want to. Set aside to let the paint dry and follow steps 1-5 to create your other pot/dowel contraption. Once done painting the second pot/dowel, put a second coat on the first, and once done with that go ahead and put a second coat on the second pot/dowel.


6. Go back to the first pot (that should be dry at this point from the second coat of paint.) And put a good coat of hot glue over about 1/2 of the top of the foam. Put moss over the glue, and repeat glue/mossing for the second side of the pot. If you missed a spot, just put a spot of glue and a small piece of moss where you missed. Use your scissors to shape the moss as you like, mine was a little lumpy, so I trimmed the moss down so it was even across the top of the pot. Cut the heads off of some of your small flowers, leaving about 1/8″ of stem and stick them into the moss as much as you like. Repeat step 6 for second pot, and tie ribbons around each pot. I used some double sided tape to keep the ribbon where I wanted it.


7. Measure out 1 or two pieces of twine so when tied onto the dowels, they’re as far apart as you want them to be. Mine twine was 43 inches long and I had two pieces of it. Tie the twine tight into a knot around your dowel in the spot you would like it, and then find the corresponding spot on your other dowel to tie the other end of twine to creating your clothesline. Trim off any tails from the twine so you don’t have excess showing, if you mess up with the twine you can cut it off and do another one. Repeat for your second line if you’re having one. Tie bows of ribbon if desired at the top of each dowel. *note* Make sure if you’re having more than one line, that one isn’t tighter than another or it could make it easy for your pots to fall over!

8. Attach pictures using small clothespins or paperclips, and make sure they are evenly dispersed across your clothesline. Clean up any mess you made, have some cookies and enjoy your handiwork!


Yay! The photoline is finished!
Cost breakdown:
Pots – $1.50
Wood buttons – a bag of 18 for $1.00… and I used two.
Dowel – $0.84
Foam – $3.00
Glue $0.20 worth of glue sticks
Flowers – $1.50 with left overs
Paint – On hand – Free! (You can get the kind I used for under $1, and the foam brushes cost about a quarter)
Ribbon – On hand… I used about 1 1/2 feet of the small ribbon and about a yard of the bigger ribbon… so probably about $2.00 worth of ribbon.
Rocks – Free from outside (You can get a bag of vase filler rocks from dollar tree)
Sand Paper – $1.50 with leftover
Twine – $2.00 with lots leftover
So depending on what you have on hand… you could pull this off for about $13.00. Not bad for something super cute!!
See you guys next time!!
-Laura
 There are just too many tasty options out there for me to go this route!


 Exhibit C:


